
More changes
Today we announce a big change. This site will no longer be about software, but about technical hobbies in a more general sense.
Mainly it will be focussing on building stuff for pleasure and daily use.
This echo’s a change in my real life where I will also start focusing more on building physical objects and less, much less, on software development.
The software is still available on github, but updates will be few and far between if ever.
Ending App Store Sales/Support
As part of a re-focussing of our business, we have decided to no longer offer app’s through the app-store.
The open source server Swiftfire will be supported on an as-needed base for both bug-fixes and development.
About document types and the UTIs
Xcode version: 10.1, Swift version: 4.1
Part of creating a document based application is setting up the document type and Universal Type Identifiers. However the existing documentation about this small and, imo, insufficient.
In Xcode the document types are defined above the exported and imported UTIs. But I find this to be misleading. The definition of the UTIs is, imo, more important than the document types. We should first create the necessary UTIs and then define the document types (which will refer to the UTIs).
Understanding the difference between document types and UTIs came when I realised the following: The document type relates to the application, the UTIs relate to the OS.
PS: I understand that the above is a simplification. Its just that this created an aha moment for me.
Imported UTIs
If the application can open documents that are in the public domain, i.e. existing file types, then the OS needs to know which ones. For this, we need to find the UTI of the supported file type. This can be difficult, and you may have to scourge the internet for them. Problem is that there is no central registry for UTIs.
An imported UTI refers to a file that can be opened by your application, but you are not the one who defined the layout or internal contruction of the file. For example our latest application can open JSON files, but obviously does not own the JSON file specification. Hence the JSON file type is covered by an imported UTI.
I found the JSON UTI in the plist.info of Xcode. I noticed that Xcode can open JSON files and checked its plist to see if there was a UTI defined for it. Sure enough it was: “public.json”
This is how we defined the imported UTI in our application:
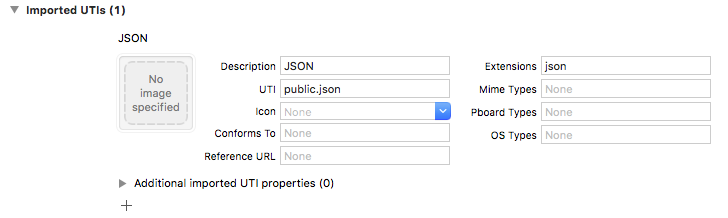
Description: Just a description, use anything you want.
UTI: The existing UTI for the filetype the application can open.
Icon: Not necessary if the file icon image is provided in the document type or if there is no file icon image.
Conforms to: Can be used to specify a parent UTI. For JSON files this could be public.text. However I have not found this to be necessary, hence its empty.
Reference URL: Here we could have specified http://json.org, but again, it seems not be necessary and hence its empty.
Extensions: This is important, this is where the link between a UTI and a file-extension is made. In our case it should of course be json. This is a bit puzzling to me as I could imagine that the association between a UTI and file-extension would be universal, and for example on my system Xcode has this association too. But I had to enter this here otherwise the application did not want to open JSON files. So be it.
Mime Types, Pboard Types, OS Types: I believe these to be relics of the past. For legacy applications this will probably be necessary, but not for our latest application.
Note: one of the errors I made was to use an intermediate UTI (in the document type & imported-UTI) and ‘conform’ the intermediate UTI to the ‘public.json’ UTI. However that did not work!
Exported UTIs
When the application defines its own file structure, a UTI must be defined in the exported UTIs. In our application we have indeed use a file structure that we defined ourselves. It’s UTI is defined as follows:
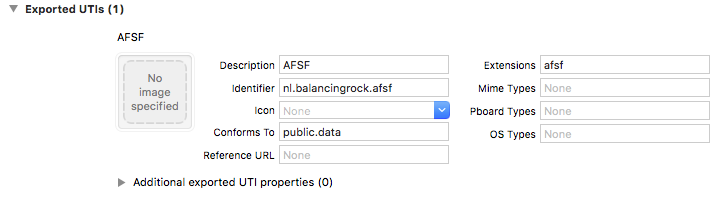
Description: Just a description, use anything you want.
Identifier: The UTI for the file structure the application defines. I do not know why it is called an Identifier, but this is in fact the UTI. Apple recommends using reverse domain name identifiers.
Icon: Not necessary if the file icon image is provided in the document type or if there is no file icon image.
Conforms to: Can be used to specify a parent UTI. It is probably best to conform to at least one parent UTI, the most general of all being the public.data UTI.
Reference URL: The afsf file format is -for now- proprietary, hence no reference URL exists.
Extensions: Again, this is where the link between the UTI and a file-extension is made. In our case we use the file extension afsf (after doing some research and making sure there does not seem to be any conflict with existing file extensions).
Mime Types, Pboard Types, OS Types: I believe these to be relics of the past. For legacy applications this will probably be necessary, but not for our latest application.
Document types
Now that the necessary UTIs are known to the OS, we can specify which document types the application can handle. For our application the two document types are defined as:
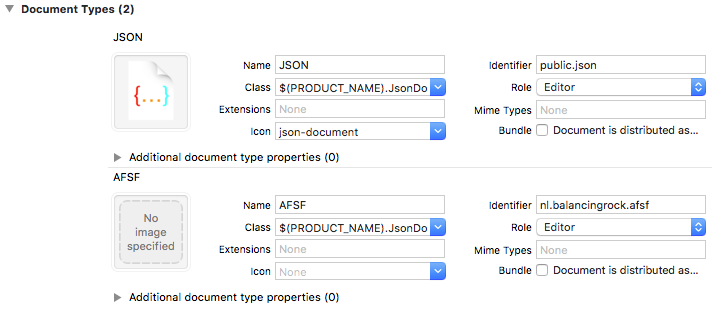
Name: Of descriptive value only, use anything you like.
Class: The name of the document class that must be created and associated with the document when opened. In our case both the afsf and json files are opened by the same document class. Even though the files have completely different structures.
Extensions: I have had nothing but trouble when using these fields. Hence we use the UTIs to associate a UTI with a file extension and left these fields empty.
Icon: When an icon set is available, specify its name here. May be empty.
Identifier: Agan apple uses the generic ‘Identifier’ label, actually this is where the link between a document type and a UTI is made. For imported UTIs this field should refer to the public UTI for the file type (i.e. do not use an intermediate UTI)
Role: Refers to the capability of the application for that document type. For exported UTIs it should probably always be ‘Editor’, for imported UTIs it could also be ‘Viewer’.
Mime Types: I have not looked into this field, it may be for backwards compatibility. We did not use it.
After the definition of the UTIs these fields are self-explanatory with the following additions:
Source code
There is an impact on the source code as well. The operation:
func read(from data: Data, ofType typeName: String) throws
now no longer uses the file extension name for the typeName, but the UTI. In our document class, which can open files of two types, we have to differentiate between the typeName’s ‘public.json’ and ‘nl.balancingrock.afsf’.
Other information sources:
The above is certainly not an exhaustive treatise on the subject. When researching this subject I found the following links to be helpfull:
Apples (outdated, but only?) documentation on Uniform Type Identifiers
Apple’s list of System-Declared Uniform Type Identifiers
A github project (UITsExplorer) that maps all UTIs on your system.
Aside from apple’s documentation, this was the most helpful blogpost I found on UTIs
This problem solving answer contains a number of very helpful terminal commands to fix problems with macOS caching of UTIs and UTI handling in general.
Using the Swift Package Manager for Cocoa projects
Xcode version: 10.1, Swift version: 4.1
The Swift Package Manager is a really neat way to manage framework usage between Swift apps. However it has no direct support to build Cocoa applications. It is possible to use the SPM with Cocoa applications. This post shows how we do it.
The problem
The problem boils down to this: the package manager can generate Xcode projects, but only console applications. Not Cocoa applications.
Once an Xcode project has been generated we can add a Cocoa target. However when the dependencies change it is necessary to re-generate the Xcode project. Which -when done- will no longer contain the Cocoa target.
The easy way
This method boils down to “never regenerate the project”. For simple projects this should be feasible.
- Using the SPM create a new executable project but do not use the envisioned name for the Cocoa project.
- Fill out the package manifest to contain the frameworks that are needed.
- Using the SPM create the Xcode project.
- In Xcode, build the project (this compiles the frameworks).
- In Xcode, add a new Cocoa target and give it the envisioned name.
- In Xcode, add the frameworks to the Cocoa target as ‘embedded binaries’.
It may happen that frameworks are updated, when that happens, do NOT regenerate the Xcode project but do the following:
- At the command line run the SPM ‘update’ command. This will update the frameworks.
- In Xcode, build the non-Cocoa target to regenerate the frameworks.
- Recommended: update the framework version number in the Xcode file navigator (only for clarity)
- Switch to the Cocoa target, and rebuild it.
This method is easy and fast but does not allow for changes to be made to the dependency structure. I.e. it cannot be used to add frameworks to the Cocoa target. If that becomes necessary the hard way must be used.
The hard way
The hard way builds on the easy way. So everything that was done above, also applies here.
But when a framework must be added to the project the following steps should be followed:
Precondition: You must be using git.
- Before doing anything, first commit all changes to git. This can be done in Xcode.
- Add the new framework to the package manifest. This can be done in Xcode.
- Exit Xcode.
- Delete the your-project-name.xcodeproj file from the project directory.
- Run the SPM update command.
- Run the SPM generate-xcodeproj command (creating the same project as before).
- Open the newly created Xcode project.
- Create the Cocoa target again (with the same name as before)
Now you will see a blue folder and a yellow folder with the same name (target). And there will be a number of files with a ‘M’ behind them.
- Select all files with an ‘M’ behind them (except for the project at the top) and right-click, select “Source Control -> Discard changes”. This restores the files from the previous target getting you back to where you were before adding the new framework(s).
- Recommended: Move the files in the blue folder that are not already in the yellow folder (of the same name) to the yellow folder. And delete the references! of the blue folder afterwards.
- Add the frameworks to the Cocoa target again (like above the easy way)
- If you made any changes to the project settings, you will need to reapply them. (Like for example a bridging header file)
Smallest Table
Xcode version: 8.2.1, Swift version: 3
This example shows how to bind a table to a simple array, but without core data or binding controllers. Everything is done in code, with just a little dusting of value-binding in the tableView itself.
Aside from the table stuff, it also contains code that opens a user dialogue to solicit a file selection from the user (NSOpenPanel).
The table will look as follows:
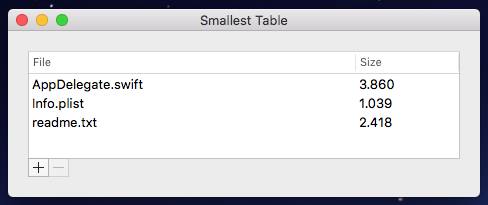
The table has two columns. In it it shows the filename and the size of that file. It also has two buttons, one to add entries to the table, and one to remove entries from the table.
The main ingredients for this example are an array and a table view. The array is defined in the AppDelegate, an since the tableview contains two fields, the table is defines as a table of struct’s where each entry has two values:
struct TableEntry {
    let path: String
    let size: UInt64
}

var table: Array<TableEntry> = []
We need access to the table view and the remove button, for simplicity the outlets for these are also defined in the AppDelegate:
@IBOutlet weak var tableView: NSTableView!
@IBOutlet weak var removeButton: NSButton!
The setup of the xib is straightforward. We use the AppDelegate as the data source and as the table view delegate, so do not forget to wire these outlets as well. Otherwise there is nothing fancy until we get to the way in which the tableview retrieves the values it needs for the table cells. For this we use a value binding. Select the table view cell as shown in the image below.
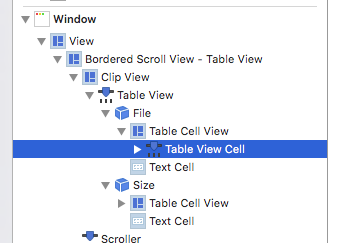
Notice in the above image that the table rows are titled “File” and “Size”. This is important as these values will be used to identify the table column in the source code later.
Then select the value binding as shown below:
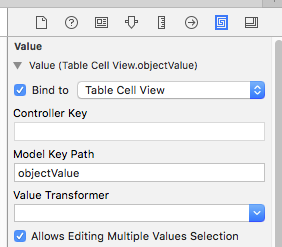
And bind the value to the Table Cell View for the key ‘objectValue’. This is all done by a click in the “Bind to” checkbox.
Once that is done, the table view will use the tableView:objectValueFor:row function from the TableViewDataSource protocol to retrieve the value of the cell. That function can be implemented as follows:
func tableView(_ tableView: NSTableView, objectValueFor tableColumn: NSTableColumn?, row: Int) -> Any? {

    switch tableColumn?.title {
    case "File"?: return (table[row].path as NSString).lastPathComponent
    case "Size"?: return table[row].size
    default: return nil
    }
}
The only other TableViewDataSource protocol function we need is the one that tells the table how many rows there are:
func numberOfRows(in tableView: NSTableView) -> Int {
     return table.count
}
With the above, the table works. However there is no data in the table yet. For this we use the “add” button. It works by opening a dialogue that asks the user to select a file (or files):
@IBAction func addButtonAction(sender: AnyObject?) {

    // Create the user dialogue
    let openPanel = NSOpenPanel()
    openPanel.canChooseDirectories = false
    openPanel.allowsMultipleSelection = true

    // Show the user dialogue
    openPanel.beginSheetModal(for: window!, completionHandler: {

        [unowned self] (button) -> Void in

        // Exit if the cancel button was clicked
        if button == NSFileHandlingPanelCancelButton { return }

        // Get all urls that were selected by the user
        for url in openPanel.urls {

            // Add the entry to the table if the file still exists
            if let size = try? (FileManager.default.attributesOfItem(atPath: url.path) as NSDictionary).fileSize() {
                let filename = url.lastPathComponent
                let newEntry = TableEntry(path: filename, size: size)
                self.table.append(newEntry)
            }
        }

        // Reload the table view as the data inside the table may have changed
        self.tableView.reloadData()

        // In this simple example this is not really necessary. Still it is a good practise to always update the GUI status (i.e. enable/disable status of its elements) after it was updated.
        self.updateGui()
    })
}
Almost done now. The only remaining action is to implement the remove button. Both the removal itself and the enabling/disabling of the button based on the status of the table selections. That last bit is easy:
func updateGui() {
    removeButton.isEnabled = (tableView.numberOfSelectedRows > 0)
}
To have this called every time the user selects or deselects a row, implement this function from the TableViewDelegate protocol:
extension AppDelegate: NSTableViewDelegate {

    func tableViewSelectionDidChange(_ notification: Notification) {
        updateGui()
    }
}
The final bit of code removes rows that were selected when the user clicked the “remove” button:
@IBAction func removeButtonAction(sender: AnyObject?) {

    // Get the indicies of the rows that are selected, and make sure they are in sequence
    let rows = tableView.selectedRowIndexes.sorted()

    // Loop over all indexes, but work from the higest index (otherwise reoving a lower index before a higher index would affect the higher index!)
    for row in rows.reversed() {
        table.remove(at: row)
    }

    // Reload the table view as the data inside the table may have changed
    tableView.reloadData()

    // Update the GUI
    self.updateGui()
}