
Smallest Table
Xcode version: 8.2.1, Swift version: 3
This example shows how to bind a table to a simple array, but without core data or binding controllers. Everything is done in code, with just a little dusting of value-binding in the tableView itself.
Aside from the table stuff, it also contains code that opens a user dialogue to solicit a file selection from the user (NSOpenPanel).
The table will look as follows:
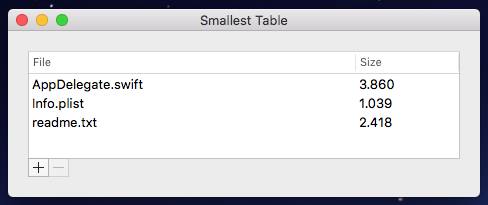
The table has two columns. In it it shows the filename and the size of that file. It also has two buttons, one to add entries to the table, and one to remove entries from the table.
The main ingredients for this example are an array and a table view. The array is defined in the AppDelegate, an since the tableview contains two fields, the table is defines as a table of struct’s where each entry has two values:
struct TableEntry {
    let path: String
    let size: UInt64
}

var table: Array<TableEntry> = []
We need access to the table view and the remove button, for simplicity the outlets for these are also defined in the AppDelegate:
@IBOutlet weak var tableView: NSTableView!
@IBOutlet weak var removeButton: NSButton!
The setup of the xib is straightforward. We use the AppDelegate as the data source and as the table view delegate, so do not forget to wire these outlets as well. Otherwise there is nothing fancy until we get to the way in which the tableview retrieves the values it needs for the table cells. For this we use a value binding. Select the table view cell as shown in the image below.
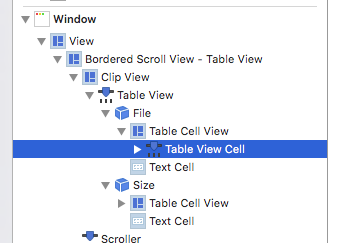
Notice in the above image that the table rows are titled “File” and “Size”. This is important as these values will be used to identify the table column in the source code later.
Then select the value binding as shown below:
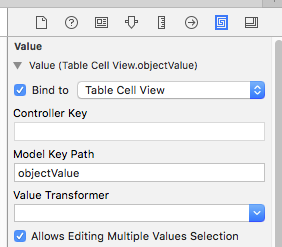
And bind the value to the Table Cell View for the key ‘objectValue’. This is all done by a click in the “Bind to” checkbox.
Once that is done, the table view will use the tableView:objectValueFor:row function from the TableViewDataSource protocol to retrieve the value of the cell. That function can be implemented as follows:
func tableView(_ tableView: NSTableView, objectValueFor tableColumn: NSTableColumn?, row: Int) -> Any? {

    switch tableColumn?.title {
    case "File"?: return (table[row].path as NSString).lastPathComponent
    case "Size"?: return table[row].size
    default: return nil
    }
}
The only other TableViewDataSource protocol function we need is the one that tells the table how many rows there are:
func numberOfRows(in tableView: NSTableView) -> Int {
     return table.count
}
With the above, the table works. However there is no data in the table yet. For this we use the “add” button. It works by opening a dialogue that asks the user to select a file (or files):
@IBAction func addButtonAction(sender: AnyObject?) {

    // Create the user dialogue
    let openPanel = NSOpenPanel()
    openPanel.canChooseDirectories = false
    openPanel.allowsMultipleSelection = true

    // Show the user dialogue
    openPanel.beginSheetModal(for: window!, completionHandler: {

        [unowned self] (button) -> Void in

        // Exit if the cancel button was clicked
        if button == NSFileHandlingPanelCancelButton { return }

        // Get all urls that were selected by the user
        for url in openPanel.urls {

            // Add the entry to the table if the file still exists
            if let size = try? (FileManager.default.attributesOfItem(atPath: url.path) as NSDictionary).fileSize() {
                let filename = url.lastPathComponent
                let newEntry = TableEntry(path: filename, size: size)
                self.table.append(newEntry)
            }
        }

        // Reload the table view as the data inside the table may have changed
        self.tableView.reloadData()

        // In this simple example this is not really necessary. Still it is a good practise to always update the GUI status (i.e. enable/disable status of its elements) after it was updated.
        self.updateGui()
    })
}
Almost done now. The only remaining action is to implement the remove button. Both the removal itself and the enabling/disabling of the button based on the status of the table selections. That last bit is easy:
func updateGui() {
    removeButton.isEnabled = (tableView.numberOfSelectedRows > 0)
}
To have this called every time the user selects or deselects a row, implement this function from the TableViewDelegate protocol:
extension AppDelegate: NSTableViewDelegate {

    func tableViewSelectionDidChange(_ notification: Notification) {
        updateGui()
    }
}
The final bit of code removes rows that were selected when the user clicked the “remove” button:
@IBAction func removeButtonAction(sender: AnyObject?) {

    // Get the indicies of the rows that are selected, and make sure they are in sequence
    let rows = tableView.selectedRowIndexes.sorted()

    // Loop over all indexes, but work from the higest index (otherwise reoving a lower index before a higher index would affect the higher index!)
    for row in rows.reversed() {
        table.remove(at: row)
    }

    // Reload the table view as the data inside the table may have changed
    tableView.reloadData()

    // Update the GUI
    self.updateGui()
}
© 2018-2021 Balancingrock.nl